@byxiaoxie4 年前
07/10
17:14
# 设置方法来源,我的小伙伴:TKS

网络状态:
    网络连接状态:光猫 -> 路由器A -> 路由器B -> PC

    光猫网段:192.168.1.1
    路由器A网段:192.168.20.1
    路由器B网段:192.168.10.1
    PC网段:192.168.10.250

    路由器A 和 路由器B 均为openwrt系统
# 设置方法来源,我的小伙伴:TKS
网络状态:
网络连接状态:光猫 -> 路由器A -> 路由器B -> PC
光猫网段:192.168.1.1
路由器A网段:192.168.20.1
路由器B网段:192.168.10.1
PC网段:192.168.10.250
路由器A 和 路由器B 均为openwrt系统搭建环境:系统 Windows 7 硬盘80G 内存16G (服务较多内存要求高)
外网访问开放端口 [8082,8085,8086,9998,9999]
必须按照顺序启动否则会提示报错Update Time 2022-5-27 00:06:51#Apex Mobile Game IP (Recommend)
13.33.0.0/16
18.200.0.0/16
23.208.0.0/16
23.50.0.0/16
23.59.0.0/16
23.61.0.0/16
31.13.0.0/16
34.240.0.0/16
34.241.0.0/16
34.242.0.0/16
34.246.0.0/16
34.248.0.0/16
34.253.0.0/16
46.51.0.0/16
52.17.0.0/16
52.18.0.0/16
52.208.0.0/16
52.210.0.0/16
52.211.0.0/16
52.212.0.0/16
52.215.0.0/16
52.31.0.0/16
52.48.0.0/16
52.49.0.0/16
52.50.0.0/16
54.154.0.0/16
54.195.0.0/16
54.246.0.0/16
54.72.0.0/16
54.73.0.0/16
54.75.0.0/16
54.77.0.0/16
63.32.0.0/16
63.34.0.0/16
99.80.0.0/16
142.251.0.0/16
157.240.0.0/16
172.217.0.0/16#Apex Mobile Game IP All
13.33.0.0/16
18.200.0.0/16
23.0.0.0/8
31.13.0.0/16
34.0.0.0/8
46.51.0.0/16
52.0.0.0/8
54.0.0.0/8
63.0.0.0/8
99.80.0.0/16
142.251.0.0/16
157.240.0.0/16
172.217.0.0/16#Apex Mobile Game IP (Untreated)
31.13.80.0/24
34.253.94.0/24
54.73.229.0/24
52.215.44.0/24
52.208.127.0/24
52.215.121.0/24
23.61.246.0/24
52.48.13.0/24
34.246.49.0/24
54.75.232.0/24
23.61.246.0/24
54.195.100.0/24
18.202.102.0/24
54.77.35.0/24
34.248.62.0/24
34.242.254.0/24
54.72.161.0/24
52.215.31.0/24
52.49.165.0/24
23.61.246.0/24
52.211.225.0/24
52.31.59.0/24
34.241.171.0/24
63.32.154.0/24
34.240.154.0/24
54.154.147.0/24
52.18.116.0/24
46.51.203.0/24
142.251.35.0/24
31.13.92.0/24
31.13.80.0/24
34.253.104.0/24
63.34.50.0/24
34.246.221.0/24
23.208.14.0/24
18.200.69.0/24
157.240.221.0/24
99.80.87.0/24
52.50.203.0/24
23.50.129.0/24
23.50.129.0/24
63.32.161.0/24
52.212.70.0/24
52.17.172.0/24
13.33.174.0/24
23.59.247.0/24
172.217.175.0/24
52.210.182.0/24
54.246.126.0/24
54.77.200.0/24
声明:转载请带上文章作者[ByXiaoXie] 本教程不提供编译好的软件包下载,如果本教程有违反法律等行为,请联系站长进行删除 谢谢!
PassWall2 编译教程:https://www.byxiaoxie.com/?p=619虚拟机系统 Ubuntu 20.04.1 硬盘80G 内存4G (ubuntu编译不可用root!)
使用[Lienol]的[OpenWrt]编译固件
OpenWrt:https://github.com/Lienol/openwrt
参考文章:https://github.com/xiaorouji/openwrt-passwall/discussions/1603安装编译环境
Ubuntu:
sudo apt-get -y install build-essential asciidoc binutils bzip2 gawk gettext git libncurses5-dev libz-dev patch python3.5 unzip zlib1g-dev lib32gcc1 libc6-dev-i386 subversion flex quilt uglifyjs git-core gcc-multilib p7zip p7zip-full msmtp libssl-dev xsltproc libxml-parser-perl mercurial bzr ecj cvs texinfo libglib2.0-dev xmlto qemu-utils upx libelf-dev autoconf automake libtool autopoint device-tree-compiler g++-multilib antlr3 gperf
Source:
git clone -b 21.02 --single-branch https://github.com/Lienol/openwrt openwrt
添加Feeds源
vim feeds.conf.default
在最后一行加上:
src-git lienol https://github.com/Lienol/openwrt-package.git;main
src-git other https://github.com/Lienol/openwrt-package.git;other
src-git PWpackages https://github.com/xiaorouji/openwrt-passwall.git;packages
src-git PWluci https://github.com/xiaorouji/openwrt-passwall.git;luci添加后更新Feeds
./scripts/feeds clean
./scripts/feeds update -a添加UPX
wget https://github.com/upx/upx/releases/download/v3.96/upx-3.96-amd64_linux.tar.xz
tar -Jxf upx-3.96-amd64_linux.tar.xz
cd upx-3.96-amd64_linux
chmod +x upx
cd ..
cd openwrt/
cp /home/用户名/upx-3.96-amd64_linux/upx staging_dir/host/bin //注意修改用户名别复制粘贴更新Goleng
pushd feeds/packages/lang
rm -rf golang && svn co https://github.com/openwrt/packages/branches/openwrt-21.02/lang/golang
popd安装Feeds
./scripts/feeds install -a默认组件和配置菜单
make defconfig
make menuconfigx86编译
Target System -> x86
Subtarget -> x86_64
Target Profile -> Generic x86/64
Target Images -> [*] Build VMware image files (VMDK) //我这里使用虚拟机测试使用所以选择VMware,其他的看自己需求需要编译什么包基本上默认的包就够
选择软件包 编译软件包 [*]内置
LuCI -> Applications -> <*> luci-app-passwall
LuCI -> Applications -> Configuration //查看passwall的必要应用有没有选上,由于软件名问题这里我不列出来那些了 配置完成后预下载dl软件包
make download -j5 V=s //使用5线程下载编译所需的软件包下载完成后开始编译,第一次编译建议先使用单线程编译
make V=99 //单线程编译
make -j 12 V=99 //12线程编译编译出来后的固件路径:/home/xiaoxie/openwrt/bin/targets/x86/64声明:转载请带上文章作者[ByXiaoXie] 本教程不提供编译好的软件包下载,如果本教程有违反法律等行为,请联系站长进行删除 谢谢!
PassWall 编译教程:https://www.byxiaoxie.com/?p=629虚拟机系统 Ubuntu 20.04.1 硬盘80G 内存4G (ubuntu编译不可用root!)
使用[Lienol]的[OpenWrt]编译固件
OpenWrt:https://github.com/Lienol/openwrt安装编译环境和下载源代码
Ubuntu:
sudo apt-get -y install build-essential asciidoc binutils bzip2 gawk gettext git libncurses5-dev libz-dev patch python3.5 unzip zlib1g-dev lib32gcc1 libc6-dev-i386 subversion flex quilt uglifyjs git-core gcc-multilib p7zip p7zip-full msmtp libssl-dev xsltproc libxml-parser-perl mercurial bzr ecj cvs texinfo libglib2.0-dev xmlto qemu-utils upx libelf-dev autoconf automake libtool autopoint device-tree-compiler g++-multilib antlr3 gperf下载源码并添加Feeds源
git clone -b 21.02 --single-branch https://github.com/Lienol/openwrt openwrt
cd openwrt/
vim feeds.conf.default在最后一行加上:
src-git lienol https://github.com/Lienol/openwrt-package.git;main
src-git other https://github.com/Lienol/openwrt-package.git;other
src-git PWpackages https://github.com/xiaorouji/openwrt-passwall.git;packages
#src-git PWluci https://github.com/xiaorouji/openwrt-passwall.git;luci //如果是编译passwall2着不需要否则会加载重复软件包
src-git passwall2 https://github.com/xiaorouji/openwrt-passwall2.git更新并安装Feeds
./scripts/feeds clean
./scripts/feeds update -a
./scripts/feeds install -a默认组件和配置菜单
make defconfig
make menuconfigx86编译
Target System -> x86
Subtarget -> x86_64
Target Profile -> Generic x86/64
Target Images -> [*] Build VMware image files (VMDK) //我用虚拟机测试所以选择VMware,其他的看自己需求需要编译什么包基本上默认的包就够选择软件包 <M>编译软件包 [*]内置
LuCI -> Applications -> <*> luci-app-passwall2 //我需要编译passwall2所以passwall就不要选择了
LuCI -> Applications -> Configuration //查看passwall的必要应用有没有选上,由于软件名问题这里我不列出来那些了配置完成后预下载dl软件包
make download -j5 V=s //使用5线程下载编译所需的软件包下载完成后开始编译,第一次编译建议先使用单线程编译
make V=99 //单线程编译
make -j 12 V=99 //12线程编译编译出来后的固件路径:/home/xiaoxie/openwrt/bin/targets/x86/64
打开配置文件 [D:\apache-tomcat-8.5.76\conf\logging.properties]
找到 47行 [java.util.logging.ConsoleHandler.encoding = UTF-8] 将 [UTF-8] 改成 [GBK]
然后保存重新启动即可解决控制台输出乱码问题
[java.util.logging.ConsoleHandler.encoding = UTF-8]
----改----
[java.util.logging.ConsoleHandler.encoding = GBK]
KMS来源:萌咖#需管理员身份打开CMD命令提示符# 激活 Windows
slmgr /skms kms.moeclub.org
slmgr /ato
slmgr /xpr# 激活 Office
cd "C:\Program Files\Microsoft Office\Office15" //打开安装目录
cscript ospp.vbs /sethst:kms.moeclub.org
cscript ospp.vbs /inpkey:XQNVK-8JYDB-WJ9W3-YJ8YR-WFG99 //需自行找一个对应Office版本的key
cscript ospp.vbs /act
cscript ospp.vbs /dstatusstd::string QueryMemInfo(LPVOID address)
{
MEMORY_BASIC_INFORMATION meminfo;
VirtualQueryEx(GameHandle, address, &meminfo, sizeof(meminfo)); //查询内存页属性保存到[meminfo]
PVOID base_address = meminfo.BaseAddress;
PVOID alloc_base = meminfo.AllocationBase;
DWORD alloc_protect = meminfo.AllocationProtect;
DWORD region_size = meminfo.RegionSize;
DWORD state = meminfo.State;
DWORD protect = meminfo.Protect;
DWORD type = meminfo.Type;
std::string s_alloc_protect;
if (alloc_protect & PAGE_NOACCESS) // 0x0001
s_alloc_protect = "NoAccess";
if (alloc_protect & PAGE_READONLY) // 0x0002
s_alloc_protect = "Readonly";
else if (alloc_protect & PAGE_READWRITE) // 0x0004
s_alloc_protect = "ReadWrite";
else if (alloc_protect & PAGE_WRITECOPY) // 0x0008
s_alloc_protect = "WriteCopy";
else if (alloc_protect & PAGE_EXECUTE) // 0x0010
s_alloc_protect = "Execute";
else if (alloc_protect & PAGE_EXECUTE_READ) // 0x0020
s_alloc_protect = "Execute_Read";
else if (alloc_protect & PAGE_EXECUTE_READWRITE) // 0x0040
s_alloc_protect = "Execute_ReadWrite";
else if (alloc_protect & PAGE_EXECUTE_WRITECOPY) // 0x0080
s_alloc_protect = "Execute_WriteCopy";
if (alloc_protect & PAGE_GUARD) // 0x0100
s_alloc_protect += "+Guard";
if (alloc_protect & PAGE_NOCACHE) // 0x0200
s_alloc_protect += "+NoCache";
std::string s_state;
if (state == MEM_COMMIT)
s_state = "Commit ";
else if (state == MEM_FREE)
s_state = "Free ";
else if (state == MEM_RESERVE)
s_state = "Reserve";
else
s_state = "Damned ";
std::string s_protect;
if (protect & PAGE_NOACCESS)
s_protect = "NoAccess";
if (protect & PAGE_READONLY)
s_protect = "Readonly";
else if (protect & PAGE_READWRITE)
s_protect = "ReadWrite";
else if (protect & PAGE_WRITECOPY)
s_protect = "WriteCopy";
else if (protect & PAGE_EXECUTE)
s_protect = "Execute";
else if (protect & PAGE_EXECUTE_READ)
s_protect = "Execute_Read";
else if (protect & PAGE_EXECUTE_READWRITE)
s_protect = "Execute_ReadWrite";
else if (protect & PAGE_EXECUTE_WRITECOPY)
s_protect = "Execute_WriteCopy";
if (protect & PAGE_GUARD)
s_protect += "+Guard";
if (protect & PAGE_NOCACHE)
s_protect += "+NoCache";
std::string s_type;
if (type == MEM_IMAGE)
s_type = "Image ";
else if (type == MEM_MAPPED)
s_type = "Free ";
else if (type == MEM_PRIVATE)
s_type = "Private";
else
s_type = "- ";
char buf[128] = { '/0' };
sprintf(buf, "%8X %8X %25s %7s %25s %7s %8X", base_address, alloc_base,s_alloc_protect.c_str(), s_state.c_str(), s_protect.c_str(), s_type.c_str(), region_size);
return std::string(buf);
}
int main(){
HANDLE GameHandle = 0x0; //游戏句柄
LPVOID BaseAddress = NULL; //游戏模块
QueryMemInfo(GetBaseAddress + OFFSET_Role); //调用方法
}不提供完整的C++代码,仅查询内存页属性代码
测试搭建环境 系统 [Ubuntu 20.04]
SRS项目地址:https://github.com/ossrs/srs
安装需要用到的软件包
apt-get install make
apt-get install gcc
apt-get install libssl-dev
apt-get install golang
apt-get install git
apt-get install python下载SRS项目
git clone https://github.com/ossrs/srs.git切换4.0版本 [默认版本为3.0,没有RTC所以需要4.0版本]
cd srs/
git checkout 4.0release //切换最新版本
git branch -v //查看当前版本编译SRS
cd trunk/
./configure --with-hls --with-ssl --with-http-server --with-http-callback --with-http-api --with-ingest --with-stream-caster
make编译完成后修改配置文件
vim conf/rtc.conf
找到[bframe discard]删除他 (原因我也不清楚这个会导致播放卡住)
修改后:
rtc {
enabled on;
}
保存配置文件
配置文件部分说明:
listen 1935; //串流端口
listen 8080; //HTTP端口
listen 1985; //API端口(一般不修改)
listen 8000; //UDP端口(一般不修改)
http_remux {
enabled on;
mount [vhost]/[app]/[stream].flv;
hstrs on; //添加这个可拉流flv
}
启动RTC
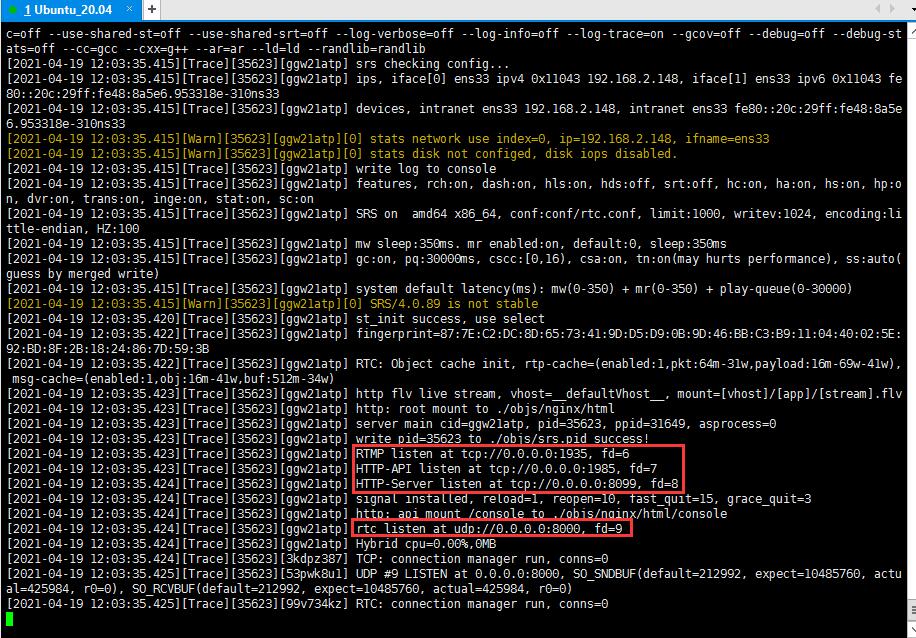
./objs/srs -c conf/rtc.confOBS推流设置
服务器:rtmp://127.0.0.1/live/
串流秘钥:myname
播放地址:

webrtc          webrtc://127.0.0.1/live/myname         (端口1985可以不用填写因为webrtc默认端口是1985)
rtmp            rtmp://127.0.0.1:1935/live/myname      (端口1935可以不用填写因为RTMP默认端口是1935除非修改了)
http/flv	http://127.0.0.1:8080/live/myname.flv  (端口8080是HTTP端口如果修改过输入对应的端口即可)
http/m3u8	http://127.0.0.1:8080/live/myname.m3u8 (端口8080是HTTP端口如果修改过输入对应的端口即可)

SRS测试地址:http://127.0.0.1:8080/players/rtc_player.html
如果外网无法播放RTC打开rtc.conf配置文件修改
candidate $CANDIDATE; //搜索找到这个
外网无法播放把 [$CANDIDATE] 修改成你的外网IP
例子: candidate 101.28.1.1;
或者尝试访问 webrtc://127.0.0.1/live/myname?eip=101.28.1.1启动后可以看到端口信息:
WebRTC测试效果(延迟1秒以下,测试图非局域网情况下测试的,网络不好的情况下1~3秒):