@byxiaoxie1 年前

03/8
21:35
Home

Openwrt 动态DDNS f3322更新失败解决方法

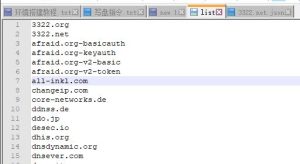
修改列表文件:
	路径:/usr/share/ddns/list 
	在列表中添加一行名称为 [3322.net] 然后保存

修改Json文件:
	路径:/usr/share/ddns/default
	将原来的 [3322.org.json] 复制一份副本然后名称修改为 [3322.net.json]
	
	修改Json内容:
		[3322.org] 名称修改为 [3322.net]
		[members.3322.org] 更改为 [members.3322.net]
		
		然后保存返回Openwrt 动态DDNS 页面编辑更换 DDNS服务供应商 为 [3322.net] 即可
		
		例子:
		{
			"name": "3322.net",
			"ipv4": {
				"url": "http://[USERNAME]:[PASSWORD]@members.3322.net/dyndns/update?system=dyndns&hostname=[DOMAIN]&myip=[IP]"
			}
		}

QQ图片20230308213047-300x83 Openwrt 动态DDNS f3322更新失败解决方法

QQ图片20230308213047-300x83 Openwrt 动态DDNS f3322更新失败解决方法

QQ图片20230308213047-300x83 Openwrt 动态DDNS f3322更新失败解决方法

Openwrt 动态DDNS f3322更新失败解决方法

@byxiaoxie2 年前

05/23
10:21
Home

OpenWrt Passwall 编译教程

声明:转载请带上文章作者[ByXiaoXie] 本教程不提供编译好的软件包下载,如果本教程有违反法律等行为,请联系站长进行删除 谢谢!
PassWall2 编译教程:https://www.byxiaoxie.com/?p=619
虚拟机系统 Ubuntu 20.04.1 硬盘80G 内存4G (ubuntu编译不可用root!)

使用[Lienol]的[OpenWrt]编译固件

OpenWrt:https://github.com/Lienol/openwrt
参考文章:https://github.com/xiaorouji/openwrt-passwall/discussions/1603
安装编译环境
Ubuntu:
sudo apt-get -y install build-essential asciidoc binutils bzip2 gawk gettext git libncurses5-dev libz-dev patch python3.5 unzip zlib1g-dev lib32gcc1 libc6-dev-i386 subversion flex quilt uglifyjs git-core gcc-multilib p7zip p7zip-full msmtp libssl-dev xsltproc libxml-parser-perl mercurial bzr ecj cvs texinfo libglib2.0-dev xmlto qemu-utils upx libelf-dev autoconf automake libtool autopoint device-tree-compiler g++-multilib antlr3 gperf

Source:
git clone -b 21.02 --single-branch https://github.com/Lienol/openwrt openwrt
添加Feeds源
vim feeds.conf.default
在最后一行加上:
src-git lienol https://github.com/Lienol/openwrt-package.git;main
src-git other https://github.com/Lienol/openwrt-package.git;other
src-git PWpackages https://github.com/xiaorouji/openwrt-passwall.git;packages
src-git PWluci https://github.com/xiaorouji/openwrt-passwall.git;luci
添加后更新Feeds
./scripts/feeds clean
./scripts/feeds update -a
添加UPX
wget https://github.com/upx/upx/releases/download/v3.96/upx-3.96-amd64_linux.tar.xz
tar -Jxf upx-3.96-amd64_linux.tar.xz
cd upx-3.96-amd64_linux
chmod +x upx
cd ..
cd openwrt/
cp /home/用户名/upx-3.96-amd64_linux/upx staging_dir/host/bin   //注意修改用户名别复制粘贴
更新Goleng
pushd feeds/packages/lang
rm -rf golang && svn co https://github.com/openwrt/packages/branches/openwrt-21.02/lang/golang
popd
安装Feeds
./scripts/feeds install -a
默认组件和配置菜单
make defconfig
make menuconfig
x86编译
Target System -> x86
Subtarget -> x86_64
Target Profile -> Generic x86/64
Target Images -> [*] Build VMware image files (VMDK) //我这里使用虚拟机测试使用所以选择VMware,其他的看自己需求需要编译什么包基本上默认的包就够

选择软件包 编译软件包 [*]内置
LuCI -> Applications -> <*> luci-app-passwall
LuCI -> Applications -> Configuration  //查看passwall的必要应用有没有选上,由于软件名问题这里我不列出来那些了
配置完成后预下载dl软件包
make download -j5 V=s  //使用5线程下载编译所需的软件包
下载完成后开始编译,第一次编译建议先使用单线程编译
make V=99  //单线程编译
make -j 12 V=99  //12线程编译
编译出来后的固件路径:/home/xiaoxie/openwrt/bin/targets/x86/64

OpenWrt Passwall 编译教程

@byxiaoxie2 年前

05/18
17:57
Home

OpenWrt Passwall2 编译教程

声明:转载请带上文章作者[ByXiaoXie] 本教程不提供编译好的软件包下载,如果本教程有违反法律等行为,请联系站长进行删除 谢谢!
PassWall 编译教程:https://www.byxiaoxie.com/?p=629
虚拟机系统 Ubuntu 20.04.1 硬盘80G 内存4G (ubuntu编译不可用root!)

使用[Lienol]的[OpenWrt]编译固件

OpenWrt:https://github.com/Lienol/openwrt
安装编译环境和下载源代码
Ubuntu:
sudo apt-get -y install build-essential asciidoc binutils bzip2 gawk gettext git libncurses5-dev libz-dev patch python3.5 unzip zlib1g-dev lib32gcc1 libc6-dev-i386 subversion flex quilt uglifyjs git-core gcc-multilib p7zip p7zip-full msmtp libssl-dev xsltproc libxml-parser-perl mercurial bzr ecj cvs texinfo libglib2.0-dev xmlto qemu-utils upx libelf-dev autoconf automake libtool autopoint device-tree-compiler g++-multilib antlr3 gperf
下载源码并添加Feeds源
git clone -b 21.02 --single-branch https://github.com/Lienol/openwrt openwrt
cd openwrt/
vim feeds.conf.default
在最后一行加上: 
src-git lienol https://github.com/Lienol/openwrt-package.git;main
src-git other https://github.com/Lienol/openwrt-package.git;other
src-git PWpackages https://github.com/xiaorouji/openwrt-passwall.git;packages
#src-git PWluci https://github.com/xiaorouji/openwrt-passwall.git;luci  //如果是编译passwall2着不需要否则会加载重复软件包
src-git passwall2 https://github.com/xiaorouji/openwrt-passwall2.git
更新并安装Feeds
./scripts/feeds clean
./scripts/feeds update -a
./scripts/feeds install -a
默认组件和配置菜单
make defconfig
make menuconfig
x86编译
Target System -> x86
Subtarget -> x86_64
Target Profile -> Generic x86/64
Target Images -> [*] Build VMware image files (VMDK) //我用虚拟机测试所以选择VMware,其他的看自己需求需要编译什么包基本上默认的包就够
选择软件包 <M>编译软件包 [*]内置
LuCI -> Applications -> <*> luci-app-passwall2  //我需要编译passwall2所以passwall就不要选择了
LuCI -> Applications -> Configuration  //查看passwall的必要应用有没有选上,由于软件名问题这里我不列出来那些了
配置完成后预下载dl软件包
make download -j5 V=s  //使用5线程下载编译所需的软件包
下载完成后开始编译,第一次编译建议先使用单线程编译
make V=99  //单线程编译
make -j 12 V=99  //12线程编译
编译出来后的固件路径:/home/xiaoxie/openwrt/bin/targets/x86/64


OpenWrt Passwall2 编译教程

@byxiaoxie5 年前

06/22
16:16
Home

Openwrt SDK编译软件包教程

Openwrt编译教程:https://www.byxiaoxie.com/?p=438

声明:转载请带上文章作者[ByXiaoXie] 本教程不提供编译好的软件包下载(需要请联系站长),如果本教程有违反法律等行为,请联系站长进行删除 谢谢!

编译环境:系统[Debian 9] 目标[bcm53xx] SDK[Openwrt 18.06.2]

SDK下载:https://openwrt.org/docs/guide-developer/using_the_sdk

注意:不能使用root用户编译

安装编译环境和代码下载

编译环境具体请查看:https://openwrt.org/docs/guide-developer/build-system/install-buildsystem
SDK对应下载请查看:https://openwrt.org/docs/guide-developer/using_the_sdk

Debian 9.4 Stretch:
sudo apt install build-essential libncurses5-dev gawk git libssl-dev gettext zlib1g-dev swig unzip time

下载SDK并解压

wget https://downloads.openwrt.org/releases/18.06.2/targets/bcm53xx/generic/openwrt-sdk-18.06.2-bcm53xx_gcc-7.3.0_musl_eabi.Linux-x86_64.tar.xz

tar xvf openwrt-sdk-18.06.2-bcm53xx_gcc-7.3.0_musl_eabi.Linux-x86_64.tar.xz

解压完成之后进入SDK然后安装feeds

cd openwrt-sdk-18.06.2-bcm53xx_gcc-7.3.0_musl_eabi.Linux-x86_64

feeds 按照自己的需求来安装即可 (这里我使用小飞机的feeds)

方案一 (小飞机的feeds,如果你是编译小飞机的话使用这个)
git clone https://github.com/AlexZhuo/openwrt-feeds.git package/feeds

方案二 (官方feeds)
./scripts/feeds update -a
./scripts/feeds install -a (这个是全部安装,看自己需求来选择不一定需要全部安装)

安装好feeds之后下载要编译的软件包到SDK中 (以小飞机示例)

git clone https://github.com/AlexZhuo/openwrt-shadowsocksr.git package/shadowsocksr-libev

下载完成后选择软件包并编译

make menuconfig  #选择要编译的包 Network -> shadowsocksr-libev

选择完毕后[exit]退出选[Yes]保存,开始编译

make package/shadowsocksr-libev/compile V=99

编译完成后打开SDK目录下的文件夹 [bin] 找到编译好的 [shadowsocksr-libev.ipk] 扔到openwrt上安装即可!
编译出错及解决方法 (正在收集):

Openwrt SDK编译软件包教程

@byxiaoxie5 年前

06/22
15:37
Home

Openwrt 无法访问光猫的处理方法

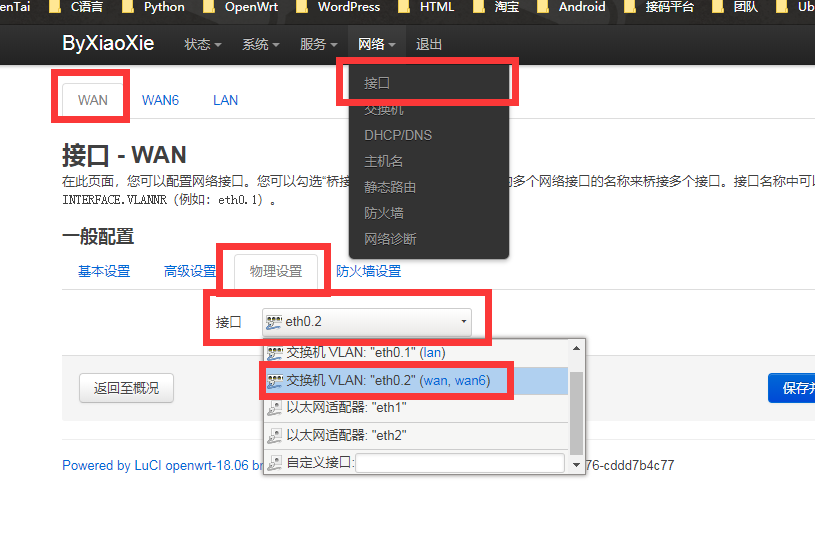
先找到连接光猫的网口,我自己的网口是 [eth0.2] 如图:

QQ截图20190622153042 Openwrt 无法访问光猫的处理方法

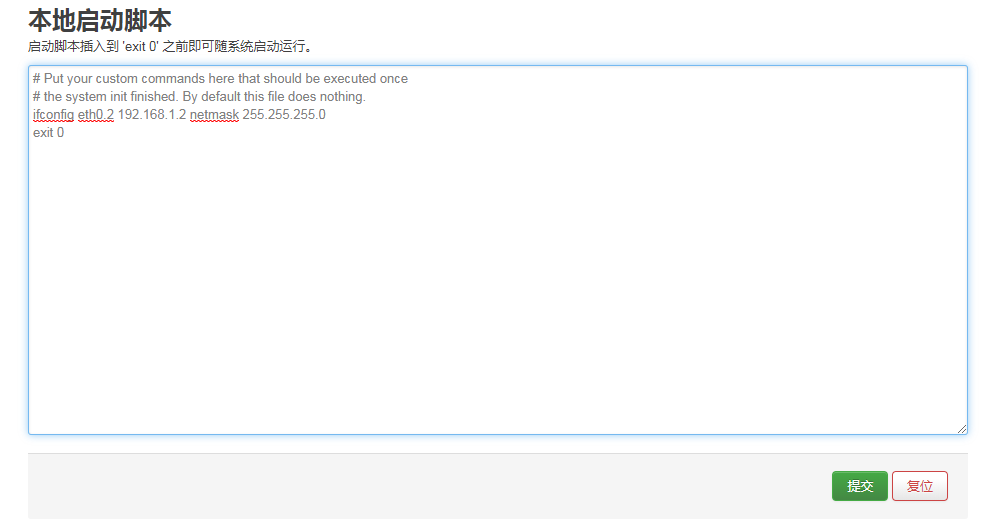
然后连接到SSH输入 [ifconfig <网口> < 光猫的网段> netmask 255.255.255.0]
如: [ ifconfig eth0.2 192.168.1.2 netmask 255.255.255.0 ] 

输入好后打开光猫的Web看看是否成功访问,可以访问之后把规则添加到 [系统 > 启动项]

QQ截图20190622153042 Openwrt 无法访问光猫的处理方法

Openwrt 无法访问光猫的处理方法

加载中……