@byxiaoxie4 年前

09/28
22:14
Home

Free HLS Live 服务器搭建

Free HLS Live 服务器搭建  测试环境 系统[CentOS 7]
Free HLS Live 需求的软件:
NodeJS
Yarn
FFmpeg
NodeJS 安装 官方网站[https://nodejs.org/en/download/]

下载 NodeJS
wget https://nodejs.org/dist/v12.18.4/node-v12.18.4-linux-x64.tar.xz

解压 NodeJS

xz -d node-v12.18.4-linux-x64.tar.xz
tar -xf node-v12.18.4-linux-x64.tar

设置软连接
ln -s ~/node-v12.18.4-linux-x64/bin/node /usr/bin/node
ln -s ~/node-v12.18.4-linux-x64/bin/npm /usr/bin/npm
ln -s ~/node-v12.18.4-linux-x64/bin/npm /usr/bin/npx

测试是否添加成功
node -v  返回值[v12.18.4]

阅读全文 →

Free HLS Live 服务器搭建

@byxiaoxie4 年前

09/25
13:18
Home

TeamSpeak 3 服务器搭建

创建新用户
useradd teamspeak
passwd teamspeak
进入新用户
su - teamspeak
下载 TeamSpeak Server 官网地址[www.teamspeak.com]
wget https://files.teamspeak-services.com/releases/server/3.12.1/teamspeak3-server_linux_amd64-3.12.1.tar.bz2

解压 tar.bz2
tar -xjf teamspeak3-server_linux_amd64-3.12.1.tar.bz2
修改文件夹名称 , 方便设置开机启动
mv teamspeak3-server_linux_amd64 teamspeak3
创建 TeamSpeak 授权文件
cd teamspeak3
touch .ts3server_license_accepted

启动 TeamSpeak 服务器 
[新创建的记得把启动后的信息复制下来,token和password 的信息都必须复制下来,客户端进去后输入token即可获取管理员权限]
./ts3server_startscript.sh start
创建开机启动
su - (返回Root下创建)

vim /lib/systemd/system/ts3.service
ts3.service 配置内容

[Unit]
Description=Teamspeak server
After=network.target
[Service]
WorkingDirectory=/home/teamspeak/teamspeak3
User=teamspeak
Group=teamspeak
Type=forking
ExecStart=/home/teamspeak/teamspeak3/ts3server_startscript.sh start inifile=ts3server.ini
ExecStop=/home/teamspeak/teamspeak3/ts3server_startscript.sh stop
PIDFile=/home/teamspeak/teamspeak3/ts3server.pid
RestartSec=15
Restart=always
[Install]
WantedBy=multi-user.target
启动关闭指令

systemctl start ts3 [启动服务端]

systemctl stop ts3 [关闭服务端]

systemctl enable ts3 [开机启动]

systemctl status ts3 [运行状态信息]


TeamSpeak 3 服务器搭建

@byxiaoxie5 年前

01/17
19:06
Home

Kaillerasrv – 街机联机搭建教程

街机模拟器 WinKawaks 1.65 (709合集)下载地址:https://pan.baidu.com/s/1DRRtgKofMCI8wxx3-ftn7w  提取码:nfoo
Kaillerasrv 0.86 服务端下载地址:https://pan.baidu.com/s/16AyC8AgatQRkL-D3_BhPlA  提取码:p3x9
服务端 [kaillerasrv.conf] 配置说明:

; Kaillera server config file

; ServerName can be up to 64 characters long.
; 服务器名称
ServerName=ByXiaoXie.Com
; Location can be up to 64 characters long.
; 设置国家地区
Location=China
; URL can be up to 128 characters long. (ex: http://www.mysite.com/)
;你的URL (可以不用设置保留空就可以了)
URL=https://www.byxiaoxie.com

; 最大用户数
MaxUsers=10
; 默认端口 27888 可自行修改
Port=27888

; Set Public to 0 if you want to run the server on a private LAN
; 是否公开搜索 (1 公网) (0局域网)
Public=1

; Use this parameter if you want to manually specify your server's
; IP address or leave blank for automatic
; (ex: IP=154.253.21.56)
; 设置成你的服务器公网IP 或 局域网联机设置成局域网IP
IP=192.168.1.100

; Messages flood protection
; FloodMsgNb is the max. number of times a same message has to
; be received in FloodMsgTime seconds.
; 防消息刷屏限制 [FloodMsgNb=5] 仅显示5条  [FloodMsgTime=3] 3秒发送一次
FloodMsgNb=5
FloodMsgTime=3

; Minimum ping restriction (in ms)
; 0=disabled
; 最小延迟限制 (0禁用)
MinPing=0

; Maximum connection setting restriction
; 0=disabled, 1=Bad, 2=Low, 3=Average, 4=Good, 5=Excellant, 6=LAN
; 连接限制 (一般默认0就可以了)
MaxConnSet=0

; Message of the Day
; Note that you can stack "MotdLine" options
; 进入服务器提示信息 (以下是我个人的配置)
MotdLine=Hello,Welcome to join [ByXiaoXie] Test Server
MotdLine=My Blog:https://www.byxiaoxie.com/

; AllowWebAccess (1=yes,0=no) 允许Web连接 (1 允许 0 不允许)
AllowWebAccess=1

; End of Kaillera server config file


Kaillerasrv – 街机联机搭建教程

@byxiaoxie5 年前

11/5
20:37
Home

宝塔 PHP SSH2 扩展安装

安装 OpenSSL:

yum install -y openssl
yum install -y openssl-devel

编译安装 libssh2:

cd /usr/local/src
wget https://www.libssh2.org/download/libssh2-1.8.0.tar.gz
tar -zxvf libssh2-1.8.0.tar.gz
cd libssh2-1.8.0
./configure --prefix=/usr/local/libssh2
make && make install

编译安装 ssh2:

cd /usr/local/src/
wget https://pecl.php.net/get/ssh2-1.1.2.tgz
tar -zxvf ssh2-1.1.2.tgz
cd ssh2-1.1.2
/www/server/php/54/bin/phpize  (修改自己的对应PHP版本[我用的PHP54])
./configure --prefix=/usr/local/ssh2 --with-ssh2=/usr/local/libssh2 --with-php-config=/www/server/php/54/bin/php-config   (修改自己的对应PHP版本[我用的PHP54])
make && make install

SSH2编译安装后有一个路径提示记录下来 如:/www/server/php/54/lib/php/extensions/no-debug-non-zts-20100525/

修改PHP配置文件添加扩展:
vim /www/server/php/54/etc/php.ini

把ssh2的路径添加到尾行

extension=/www/server/php/54/lib/php/extensions/no-debug-non-zts-20100525/ssh2.so

添加后重启php然后查看[phpinfo]看下是否扩展安装成功或在控制台输入[php -m | grep ssh2]成功后返回[ssh2]失败返回空白,如果报错查看路径是否正确

ssh2 宝塔 PHP SSH2 扩展安装

ssh2 编译安装报错:

更换ssh2版本:
wget http://pecl.php.net/get/ssh2-0.12.tgz


宝塔 PHP SSH2 扩展安装

@byxiaoxie6 年前

06/22
16:16
Home

Openwrt SDK编译软件包教程

Openwrt编译教程:https://www.byxiaoxie.com/?p=438

声明:转载请带上文章作者[ByXiaoXie] 本教程不提供编译好的软件包下载(需要请联系站长),如果本教程有违反法律等行为,请联系站长进行删除 谢谢!

编译环境:系统[Debian 9] 目标[bcm53xx] SDK[Openwrt 18.06.2]

SDK下载:https://openwrt.org/docs/guide-developer/using_the_sdk

注意:不能使用root用户编译

安装编译环境和代码下载

编译环境具体请查看:https://openwrt.org/docs/guide-developer/build-system/install-buildsystem
SDK对应下载请查看:https://openwrt.org/docs/guide-developer/using_the_sdk

Debian 9.4 Stretch:
sudo apt install build-essential libncurses5-dev gawk git libssl-dev gettext zlib1g-dev swig unzip time

下载SDK并解压

wget https://downloads.openwrt.org/releases/18.06.2/targets/bcm53xx/generic/openwrt-sdk-18.06.2-bcm53xx_gcc-7.3.0_musl_eabi.Linux-x86_64.tar.xz

tar xvf openwrt-sdk-18.06.2-bcm53xx_gcc-7.3.0_musl_eabi.Linux-x86_64.tar.xz

解压完成之后进入SDK然后安装feeds

cd openwrt-sdk-18.06.2-bcm53xx_gcc-7.3.0_musl_eabi.Linux-x86_64

feeds 按照自己的需求来安装即可 (这里我使用小飞机的feeds)

方案一 (小飞机的feeds,如果你是编译小飞机的话使用这个)
git clone https://github.com/AlexZhuo/openwrt-feeds.git package/feeds

方案二 (官方feeds)
./scripts/feeds update -a
./scripts/feeds install -a (这个是全部安装,看自己需求来选择不一定需要全部安装)

安装好feeds之后下载要编译的软件包到SDK中 (以小飞机示例)

git clone https://github.com/AlexZhuo/openwrt-shadowsocksr.git package/shadowsocksr-libev

下载完成后选择软件包并编译

make menuconfig  #选择要编译的包 Network -> shadowsocksr-libev

选择完毕后[exit]退出选[Yes]保存,开始编译

make package/shadowsocksr-libev/compile V=99

编译完成后打开SDK目录下的文件夹 [bin] 找到编译好的 [shadowsocksr-libev.ipk] 扔到openwrt上安装即可!
编译出错及解决方法 (正在收集):

Openwrt SDK编译软件包教程

@byxiaoxie6 年前

06/22
15:37
Home

Openwrt 无法访问光猫的处理方法

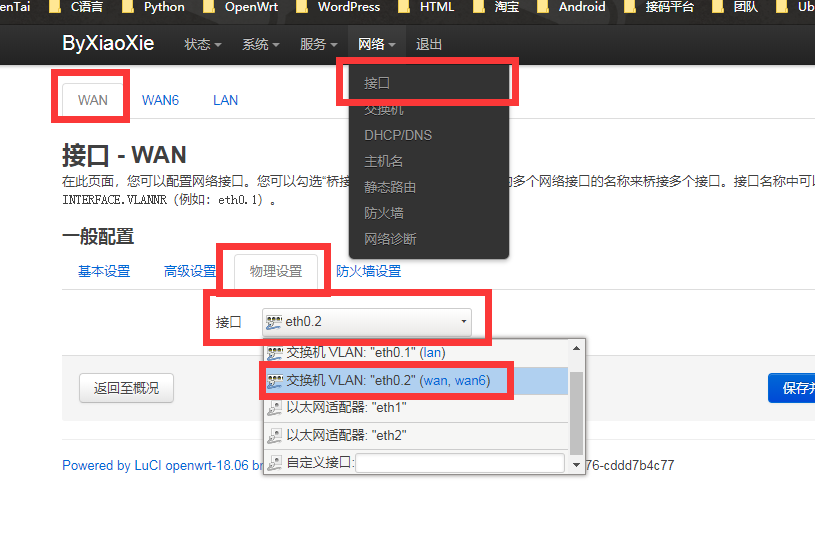
先找到连接光猫的网口,我自己的网口是 [eth0.2] 如图:

QQ截图20190622153042 Openwrt 无法访问光猫的处理方法

然后连接到SSH输入 [ifconfig <网口> < 光猫的网段> netmask 255.255.255.0]
如: [ ifconfig eth0.2 192.168.1.2 netmask 255.255.255.0 ] 

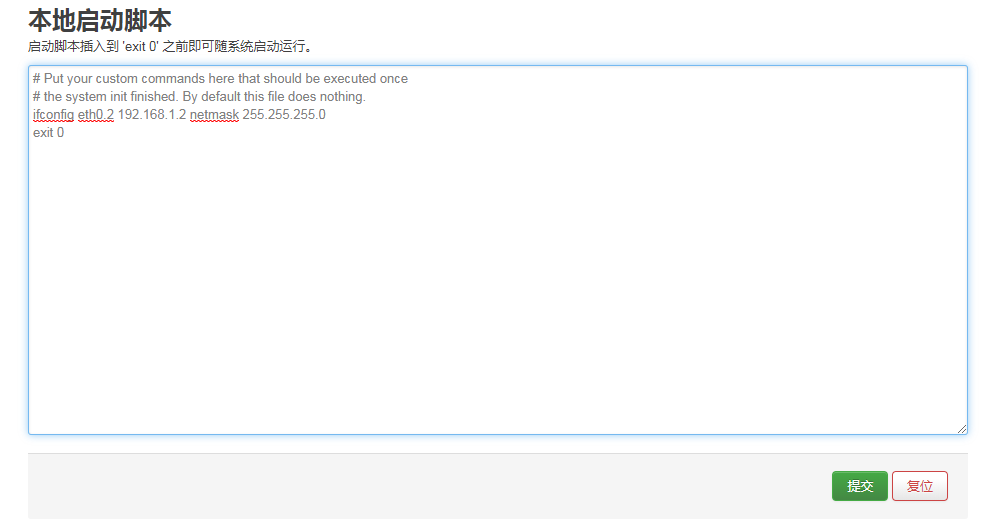
输入好后打开光猫的Web看看是否成功访问,可以访问之后把规则添加到 [系统 > 启动项]

QQ截图20190622153042 Openwrt 无法访问光猫的处理方法

Openwrt 无法访问光猫的处理方法

@byxiaoxie6 年前

06/18
22:00
Home

PC微信多开破解教程

微信防撤回:https://www.byxiaoxie.com/?p=428

破解方法 ByXiaoXie.Com

定位到DLL文件[WeChatWin.dll]

方法1:
搜索字符串找到 [WeChat_App_Instance_Identity_Mutex_Name]


方法2:
直接搜索特征码然后把je跳转到函数结束的地址去
74 ?? 66 83 3E ?? 8B C6 75 ?? B8 ?? ?? ?? ?? 50 6A ?? 6A ?? FF 15 ?? ?? ?? ?? 8B F8 32 DB 85 FF 74 ?? FF 15 ?? ?? ?? ?? 3D ?? ?? ?? ?? 75 ?? 57 B3 ?? FF 15 ?? ?? ?? ?? EB ?? 89 3D //该特征码过期

74 ?? 56 6A 00 68 ?? ?? ?? ?? FF 15 ?? ?? ?? ?? 8B F0 85 F6  //新特征码

74 ?? 66 83 3E 00 8B C6 75 ?? B8 ?? ?? ?? ?? 50 6A 00 6A 00  //22-01-24 新特征码 [修改方法不变]
新版本3.2.1.154修改方法:

原型:039B07E7     /74 56         je      short 039B083F
修改后:039B07E7     /EB 56         jmp      short 039B083F

已过期的老版本方法:

原型:0FE973B1  |. /74 08                 je XWeChatWi.0FE973BB
修改跳转地址到:104A5EAE  |> \5F                    pop edi
修改后:0FE973B1     /EB 5B                 jmp XWeChatWi.0FE9740E

保存后即可多开微信!

PC微信多开破解教程

加载中……